Tuesday, October 26, 2010

Tartine Tuesday: Egg Salad Tartines

My Dad is here visiting for the next few weeks, and he graciously lugged a suitcase full of all of the things from my "Bring from the USA" list.

Here are some of the things that were on that list:

Theraflu
Mascara
Winter Clothes
Stuff from Amazon.com
Yellow Mustard

With the start of the winter flu season, I asked for a hefty supply of my favorite go-to cold remedy... Theraflu (and I've already used one this week)... thanks Mom for sending 3 boxes! Mascara is inconceivably expensive here at around $16-20 for even the cheapest brands, so I asked for 2. Of course, I needed all my winter coats, stockings, and sweaters that wouldn't fit in my suitcases this past July. There were a few goodies I bought for myself from Amazon.com... a sharpening stone for my knives, yoga mat, knife guards, etc. And lastly, and somewhat most importantly, yellow mustard.

I feel bad being one of those people who needs something, especially food related, from home. I'm living in France, I should drink their wine, eat their cheese, and use their mustard. I can drink their wine, and definitely eat their cheese, but when it comes to their mustard, I just can't. One, some of the French mustards will literally kick you into next year. Talk about opening up your sinuses. And two, being the foodie that I am, there are just a few things that I refuse to make unless I have yellow mustard. One, is deviled eggs, and another is egg salad.

Hard Boiled Egg, Chopped

I refuse to pay the outrageous price of 5-7 Euros for a teensie weensie little jar of yellow mustard here. I've looked all over at discount grocery stores and random shops trying to find a decently priced jar of yellow mustard, but have been without luck. There are a couple of "American" grocery stores here, Thanksgiving and The Real McCoy, and I'm sure that's where I'll find the cheapest prices, but I figured since my Dad was already on his way here, he could just toss a bottle in his suitcase.

Perfect timing for me, because now I can make these:

Egg Salad Tartines

Egg Salad Tartines

6 slices of sprouted wheat bread, toasted
3 large eggs
1/2 of a small red onion, minced
1 small bunch of chives, chopped
2-3 tablespoons mayonnaise
1-2 tablespoon mustard
salt and pepper, to taste


To hard-boil the eggs, place the eggs in a pot and fill with cold water until the eggs are just completely covered. Place over medium high heat. Once the water starts to boil, remove from the heat, cover and set a timer for 13 minutes. Once the 13 minutes are up, pour the hot water out of the pot and fill with cold water to stop the eggs from cooking. Once the eggs are cooled you can store them in the fridge until you need them. If you need to, you can do this a day or two in advance.

Peel and roughly chop the hard boiled eggs. Place into a bowl with the mayonnaise, mustard, and a few pinches of the chopped chives. Mix gently to combine (taste as you go, you may like your egg salad a little more mustard-y or a little more mayo-y). Salt and pepper to taste. 

Place egg salad on top of the toasted slices of sprouted wheat bread and top with minced red onion and chopped chives. Serves 2.

Tuesday, October 19, 2010

Tartine Tuesday: Serrano Ham, Arugula, and Butter Tartines

I am finally living in Paris! I spent the last week moving my stuff from the Paris suburbs of Bougival to our apartment in the 13eme (13th arrondissement), and all of my suitcases are finally empty. Such a great feeling. I can finally really start to explore this city!

My favorite thing about exploring Paris (besides finding good food, of course) is finding all the little parks that are strewn about the city. There is a park for every personality. There are the super touristy parks that are perfect for people watching, such as le Jardin des Tuileries and Jardin du Trocadero... Tiny garden hideaways tucked between the buildings, where you can steal a quick romantic moment... There is even le Parc des Buttes Chaumont, complete with it's own waterfall and an amazing view of the city.

One of my favorite parks at the moment is le Jardin du Luxembourg. There is something magical about this park. I recently went early one Wednesday morning to relax and soak in the atmosphere.

Jardin du Luxembourg

On a warm, sunny day, le Jardin du Luxembourg is usually bustling with tourists and children playing in the fountain with les petits bateaux. But that day, there was a slight gloom over Paris, which lent an almost eerie silence to the park. As I walked through the rows of perfectly lined trees, I passed a group of older men and women doing Tai-Chi. Their slow, fluid movements mimicked the wind moving through the trees, and the branches seemed to join them in their routine. The murmur of children's voices could be heard in the distance as they practiced their tennis lessons. Empty chairs surrounding the fountain were positioned as though invisible bodies were in deep conversation. It was a completely different park than when I last was here.

Jardin du Luxembourg

I sat myself underneath a tree (just in case it started to rain), with a view overlooking the park. I watched a younger group of adults practicing Tai-Chi to my left. It was obviously a taught class, led by an older and much more experienced French woman. I listened in to see if I could make out what she was saying... good way to practice learning French, I figured.

I was straining to hear what the woman was saying, but kept getting distracted by a rustling in the trees above me. As I looked up I saw tiny birds dangling from the branches, sipping up little droplets of water that had condensed onto the leaves. After about 5 seconds of thinking how cute the little birds were above me, I immediately thought, "Oh SHIT." No literally, SHIT. In less than a second the equation came together in my head, "Birds nibbling on leaves... birds get full... birds need to poop... SHIT." And just as I put that all together... splat. Like freaking magic. Right on my pants. It was like the park (or the birds, I guess) had read my mind. Luckily my pants were dark brown, and after wiping the shit off it was barely noticeable. I literally laughed out loud at the coincidence; the people around me probably thought I was crazy... apparently laughing at thin air. Oh well! 

I washed my hands (and pant leg), and moved out from underneath the trees. The sun was starting to come out now, and after all that mess I (strangely) was starting to get hungry. I went to the grocery store earlier that morning to grab some things for lunch, so I dug into my bag and made myself a little tartine. 

Ingredients

This tartine is all about good quality ingredients. The French don't drown their sandwiches in tons of mayonnaise, mustard, ketchup, and dressings like we do in the States. They do though, however, use one condiment that, if they so choose, always makes a sandwich better. Butter. For this recipe, I recommend going all out for the ingredients. If you can find high-quality European butter, use it. If you can find arugula that doesn't come pre-washed in a sealed, plastic bag, get it. It's incredible the difference it makes.

Arugula

I found some 18 month old Seranno ham at La Grande Epicerie, and it was just so beautiful that I had to get some. If you have access to a bakery that sells freshly baked baguettes, go there. I'm not trying to be a food snob. It's just that since there are really only 4 ingredients, why not make them all the best?

18 Month Serrano

So today's super simple Tartine Tuesday is coming to you straight out of the park... minus the birds, of course.

Seranno Ham, Arugula, and Butter Tartines

Serrano Ham, Arugula, and Butter Tartines

1 baguette aux cereales (multi-grain baguette)
a handful of arugula
200 grams of thinly sliced serrano ham
salted butter (use high-quality butter or european butter if you can; it really makes a difference)


Spread some butter on a piece of baguette, top with arugula and serrano ham. Serves 2.

Sunday, October 10, 2010

10 Tips and Tricks for Making French Macarons

I love my boyfriend's job. Well, more-so I love the fact that Quentin coincidentally got the perfect job to benefit me (and him too). He's working for Cook'n with Class, a French cooking school which teaches classes in English (to English speaking tourists mostly). I had the opportunity this past Friday to sit in on one of their French macaron making classes. I was so excited... I've been wanting to know how to make them ever since I landed in France!

Sour Cherry Macaron

I am embarrassed to admit (being the foodie that I am), that my very first bite of a French macaron was only taken less than three months ago, at Angelina. I know, I can't believe it either. It's just that I never had access to true French macarons in the States! We have coconut macaroons, but they are not even close to the chewy, gooey, crispy, creamy, heavenly creation that is the French macaron. MMMmm... that reminds me... I still haven't tried Pierre Hermé's macarons. Perhaps tomorrow... hehe.

Tamara Piping the Macarons

Macaron Making

Done with Piping

We made three different flavors of macarons in the class (well, three different filling flavors); sour cherry, dark chocolate, and fleur de sel caramel. The class was so much fun, and super informative. I learned so much! The teacher, Pino, really knew his stuff. I asked him questions like; "Why do you strain the eggwhites?" "Can you over-beat the macaron batter?" "How do you fix a runny caramel buttercream?" He had an answer to everything, explaining exactly how and why.

Can we eat them now?

Pino also warned us that we shouldn't eat more than 10 macarons in one day, or we would get "poopy butt"... his words exactly. I ate 5 or 6 (... or maybe 7) and ended up with a stomach ache at the end of the night... but it was soooo worth it.

A Sea of Macarons!

I am not going to post the recipe here... because it's better to go to the class! Also, you can probably find some similar recipes on the web. What I do want to do though, is share with you what I learned from that class.

10 Tips and Tricks I learned for making French macarons:

1.  Make sure when you are making macarons that it is not a wet, humid day. Humidity prevents the macarons from rising properly and can cause the tops to crack. If it is a rainy day, and you must make macarons, you can use a de-humidifier or turn your oven on low to dry out the room a bit while making them.

2. When making the macaron batter, be sure to sift the almond flour and sugar two times before mixing them together with the wet ingredients. Also, don't push the flour/sugar through the sieve, just gently tap the sieve until you are left with the lumps. Pour whatever doesn't pass through the sieve into a bowl, and using a scale, weigh the larger chunks and replace them with almond flour (be sure to sift that too!) This will ensure that your macaron tops are smooth.

3. Strain the egg whites to break apart the thick white part, and remove the chalaza, the little white strand that holds the yolk in the center of the egg. This also makes the egg whites easier to pour when measuring.

4. Slowly pour the sugar syrup down the side of the mixing bowl, in the same spot the whole time. Pouring in the same spot makes the area on the bowl very hot and the sugar will glide easily down the side of the bowl. 

5. When mixing the flour/sugar mixture with the egg whites and meringue mixture, you must mix it quite forcefully, with a spatula, until the batter becomes thick and shiny. I found it's much easier to mix in a counter-clockwise motion.

6. If your batter is too thin, you can add a tablespoon of almond flour at a time until you reach the desired consistency.

7. When mixing food coloring into the batter to color your macarons, be sure to use a gelatin-based food coloring (such as Wilton), as that will not disturb the consistency of the batter.

8. Once macarons are piped onto parchment paper on a baking sheet, let them rest in a warm, dry place for a few minutes to create a skin over them. They are ready to place in the oven once you are able to touch the tops and the batter does not stick to your finger.

9. While baking the macarons, keep the oven door cracked open with a utensil to let the moisture escape. This ensures the macarons will rise evenly and without cracking.

10. When macarons are finished baking, move them (still attached to the parchment paper) off of the baking sheet and onto a cool counter top to cool the bottom side of the macarons for a few minutes. Remove them with a pastry scraper before they become completely cool, and flip them upside-down to finish cooling before piping the filling.


Hope these tips help, and hooray to anyone making them!! Bonne chance!

Tuesday, October 5, 2010

Tartine Tuesday: Spanish Chorizo, Egg, and Chive Oil Tartines

I don't know if I'll ever adapt to the coffee and pastry regime that is the French breakfast. I love starting my day with a good stick-to-your-ribs breakfast of eggs and meat. Much like my scrambled eggs with créme fraîche and lardons recipe, I tried to use a little French inspiration to drive this more American-style breakfast. 

Chorizo, Egg, and Chive Oil Tartines

The French have an affinity for cured meats, and saucisson and chorizo make frequent appearances to the table. You can adapt this recipe to whatever cured meats you have on hand (I used saucisson rosette the other day), just make sure they are thinly sliced to make for easier noshing. For this recipe, I used a spicy Spanish chorizo, which balanced well with the slight sweetness from the bread and creaminess of the egg. Be sure to use a meat which is cured, and does not need to be cooked, unlike Mexican chorizo. This will make your morning a little bit easier; one less thing to cook, one less pan to clean!

Continuing my LifeGreens programme bien être, I am using an organic sprouted wheat loaf instead of regular bread for these tartines (introduced to me by the LifeGreens CEO himself). Sprouted breads have no added sugar, fat, or preservatives (literally, the ingredients in my loaf are: sprouted wheat, almonds, and orange blossom water), and helps to regulate your blood sugar and digestion.

Sprouted Wheat Loaf with Almonds

The loaf I used for this recipe has whole almonds studded throughout, which gives the dense and sometimes "difficult to think of as bread" texture a welcome crunch. Toasting the slices also brings out the nutty flavors of the almonds and eliminates some of the gummy texture. You can find sprouted grain loaves in many different flavors in most specialty health food stores. The texture is quite unlike your everyday bread, and can take some getting used to, but the flavor is delicious and the health benefits are a plus!

P.S. - Best eaten with a knife and fork.

Chorizo, Egg, and Chive Oil Tartines

4 slices of sprouted wheat bread with almonds, toasted
100 grams (1/4lb) of thinly sliced spanish chorizo
4 eggs
1/2 bunch of chives, chopped
olive oil
1 tablespoon butter
salt and pepper, to taste

Using a mortar and pestle, grind the chopped chives and olive oil together just until a paste is formed. After you have a thick paste, whisk in about 1-2 tablespoons of olive oil to make the paste thin enough to drizzle on top of the tartines.

Melt a tablespoon of butter in a medium frying pan (or non-stick pan) over medium-low heat. Crack the eggs into the pan and cook until the white part of the egg has set, about 3-5 minutes.

Place equal amounts of thinly sliced chorizo on each slice of toasted bread. Top with a sunny-side up egg and drizzle the chive oil over the top. Salt and pepper to taste. Serves 4.

Saturday, October 2, 2010

Dark Chocolate Espresso Soufflés

Dark Chocolate Espresso Souffle

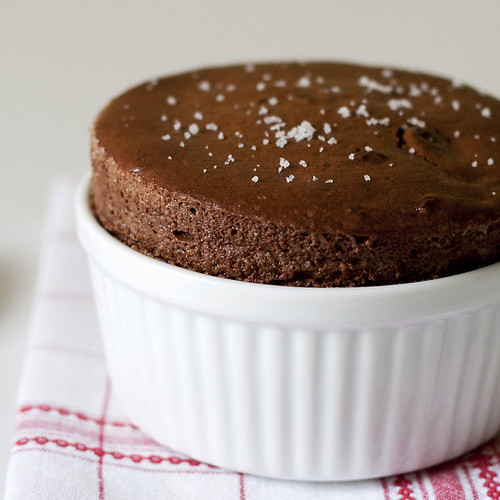
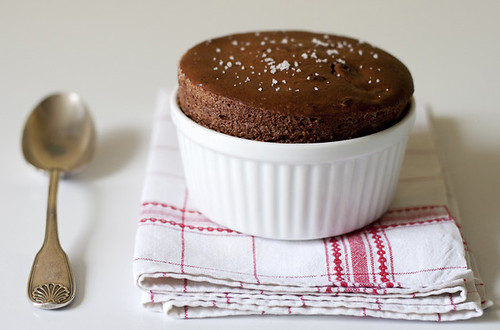
If heaven were a dessert (I like to think that my heaven would be full of tasty treats), this would be it. Even Quentin, who doesn't usually like desserts or chocolate, goes into the kitchen to grab himself a spoon. For me, the crispy crackling top, gooey interior surrounded by an airy cake-like exterior and a crystal sugar crust make the soufflé one of the most texturally intriguing things I have ever put in my mouth. Every bite is different. Every bite is delicious.

Gooey in the Middle

I always thought that the intimidating soufflé was a little far out of my league. I haven't been cooking for that long, and I've heard horror stories of soufflés that never rose, ones that toppled over into a hot mess, and some that went plummeting once the oven door was opened. I wanted to really test my skills, so I gave it a shot.

I originally got the recipe from Cooking for Engineers, and the first time I made them, they came out perfectly, with their crisp tops rising above the fluffiness beneath. It wasn't so hard. Maybe I just got lucky. I tried the recipe again. Once more, they came out with their crowns held high. Then I started to experiment with the ingredients. I think that's how a lot of cooks, chefs, and food lovers come up with their own recipes. Test. Tweak. Re-test.

Dark Chocolate, Chopped

So here's how I came to mine. One day, I tried making them with whole milk (I was out of heavy cream) and cinnamon. I loved the lighter, more airy texture, but the cinnamon gave you too much of the "holiday" feeling, and I just wasn't feeling it. I tried it again, this time with the heavy cream, and a packet of Starbuck's Via instant coffee. It was good, but Starbuck's coffee sometimes leaves me with a burnt taste in the back of my mouth, and it did the same with the soufflés. I recently tested the recipe with instant espresso powder, fleur de sel, and fermented milk (not spoiled milk, actual, bought-from-the-store-fermented milk) just to see what it would do. Yeah, not doing that again. It wasn't horrible, but the fermented milk gave it a tang that was not what I wanted in my soufflé. 

Souffle Batter

Fleur de Sel

I thought long and hard about what I liked and didn't like about each of my soufflé experiments. I loved the lightness of the soufflés that I made with the whole milk. The instant espresso really brought out the chocolate flavor in another batch I made, and the fleur de sel sprinkled on top were like little flavor bursts that enhanced all of the chocolatey flavors as the salt melted on your tongue. So here it is... my Ultimate Soufflé.

Dark Chocolate Espresso Souffle

Dark Chocolate Espresso Soufflés

2oz (60ml) whole milk
8oz (230g) dark chocolate, chopped
1 tablespoon (14g) unsalted butter, plus extra for greasing ramekins
1 teaspoon instant espresso powder
1 teaspoon vanilla extract
4 egg yolks
5 egg whites
1/8 teaspoon cream of tartar
1/3 cup (70g) superfine sugar, plus extra for dusting ramekins
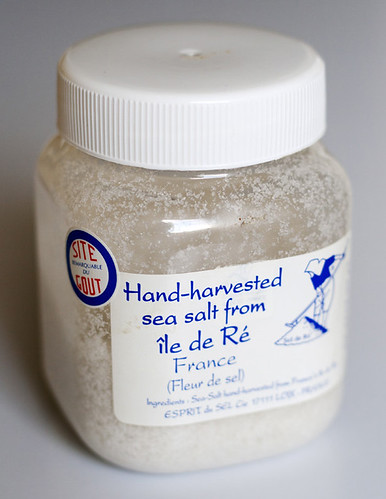
fleur de sel, to taste (you can find fleur de sel at many specialty food stores, such as Williams-Sonoma)

Preheat oven to 375° Fahrenheit (190° Celsius). 

Grease the bottom and sides of four (4-inch wide by 2-inch deep) ramekins with butter and dust completely with sugar, being sure to knock off any excess. 

Separate the eggs into two bowls, one for the yolks, and one for the whites. Be sure to use the freshest eggs possible, as that will insure fluffy egg whites.

In a double boiler, or a large bowl over a pot of simmering water (make sure bottom of the pot does not touch the water) melt together the butter, milk, chocolate, vanilla, and espresso powder. Remove the bowl from the heat just before the chocolate has completely melted, so as not to scorch the chocolate. Stir until all of the chocolate has melted and let cool for about 3 minutes. Add the egg yolks one at a time and whisk to combine, making sure that all of the yolks are completely incorporated into the batter.

In a large bowl, beat the egg whites and the cream of tartar together with a hand mixer. Once the egg whites start form soft peaks, add the 1/3 cup (70g) of sugar and continue to beat until the egg whites form stiff peaks. *To test for peak stiffness, lift the beaters out of the egg whites and turn upwards, with the beaters facing the ceiling. For soft peaks, the tips of the egg whites will droop. For stiff peaks, the tips of the egg whites will stand pointed and firm.

Add 1/3 of the egg whites into the chocolate mixture and fold gently to combine. Once combined, continue with another 1/3 of the egg whites, again, folding in gently. Add the last 1/3 of the egg whites and without over mixing, fold into the batter.

Pour into ramekins and fill completely to the top. For a nice even top, fill the ramekins a little more than completely full, and use the flat edge of a spatula or back of a knife to even off the top (much like you would do when measuring flour).

Bake in the center rack of the oven for 15 minutes, being sure not to open the oven door until they are finished! Sprinkle the tops of the soufflés with fleur de sel, and serve immediately. Serves 4-8(two can share one).

*On a healthier note, yesterday was day one of my LifeGreens programme bien être (well-being program). Don't worry, I will still post some cakes and not-so healthy recipes here and there... but since I've moved away from the processed foods and cheeseburger-filled diet that was my life in the States, I've noticed quite a large shift in the way I'm eating. Living in a country where the overall eating mentality is not about counting calories or eating low-fat this or non-fat that, but about the quality and freshness of the food you eat; I have decided to mirror my efforts on eating well, and improving my overall well-being.

My friend Jules, CEO of LifeGreens, introduced me to his LifeGreens blé en herbe (wheat grass) supplements a few months ago. I noticed the wheat grass trend growing in the States, and it is seems to just now be breaking through here in France. In the States, I've watched people down unappetizing cups of freshly pressed wheat grass like a shot of grain alcohol, nose plugged, eyes closed. Yum. But with smoothie shops and juice bars popping up all over the place here, it's only a matter of time before wheat grass shots become a must-have on the menu.

I was apprehensive about trying Jules' supplements, but he explained to me how his product actually tastes better, and is easier to incorporate into my diet than the unappealing shot of green muck. LifeGreens supplements are winter wheat grass in powdered form, mixed with papaya enzyme, which aides in digestion and absorption by the body. I think the papaya also makes it a little more palatable. You can mix the LifeGreens blé en herbe with fruit juices, in recipes, or just in a glass of cold water. I could go on to explaining the details, but all the information is on the website, so you can check it out here. To all my non-French speaking readers, sorry! The site is completely in French, but Google Translate seems to work fairly well.

Day one (yesterday), I had it with a glass of water and a squeeze of fresh lemon juice. Not bad.

This morning, I mixed it in a glass of orange juice... much better.

I'm interested to see how the daily addition of LifeGreens along with healthy eating, exercise (hopefully), and meditation will improve my well-being. Check back to see how I'm doing!